Field Service Management for Industrial Equipment & Manufacturing Companies

The Industrial equipment and machine manufacturing companies manufacture and service a wide variety of mission-critical, high value assets. The equipment typically worth millions of dollars is the backbone of these companies and cannot afford to have any downtime. If this equipment breaks down or malfunctions, productivity drops, costs rise, and reputations suffer; with the potential of significant revenue loss. This makes it crucial for the Industrial equipment and machine manufacturing companies to deliver phenomenal service and ensure 100% availability of the equipment.

Securely Extend Your Enterprise to Mobile Devices

The proliferation of mobile devices, combined with faster network connectivity and infrastructure provides a new channel for enterprises to solve the challenges they face in serving customers, employees, and stakeholders. Real-time connectivity across functions in enterprises, and blurring of lines between consumer and enterprise solutions mean that organizations stand to gain tremendously in agility and competitive advantage through innovative mobility solutions that gather valuable insight into operations and performance.
 
At the same time, mobility solutions also present large challenges, such as the integration of these solutions to existing infrastructure and systems, as well as scalability and security. Hence, some of the key considerations for organization looking to overcome these challenges include:
 
• How can existing server-side or middleware architecture be integrated with newer, faster, and more efficient mobile applications?
• What should the enterprise server side architecture look like?
• How are security, business scalability, and performance requirements met?
• What are the considerations when designing next-generation architecture for mobile applications?


FieldEZ, an enterprise mobility solution, focused around field force automation, understands these requirements to provide a strongly-integrated solution that is robust, secure, and scalable.
 
FieldEZ’s ready-to-run application can be accessed independently or can be integrated into existing CRM applications. It helps organizations extend existing field service processes to deliver optimized workflows. In addition, FieldEZ supports multi-channel customer service, schedule optimization for field resources, mobile and wireless connectivity, inventory management, and invoicing functionality.
 
FieldEZ offers a classic multi-tier, cloud-based framework that comprises a persistence tier (for storing user and application data), an application server (for business logic) and the presentation layer (for rendering end user access). With its ability to support the development of front-end client and back-end integration layers, FieldEZ allows organizations to develop on-device mobile applications that run on a variety of devices and operating systems.


Cloud/Application Server
FieldEZ is deployed on Amazon cloud EC2 (a Tier 4 certified data center) and is spread across two data centers in North America. The Nginx web server clusters and Tomcat application server are deployed in separate virtual server instances across the data centers. This ensures that the servers support connection requests at all times (from mobile clients and web browsers).


Database Storage
The FieldEZ framework uses MySQL database server with two instances running in primary – slave mode. Maintained in different physical locations, the primary database contains all the data, inventory, workflows, and business logic. This information is periodically backed up in the slave database, with transaction logs backed up every 15minutes and full backups done daily If the primary database server fails for any reason, the application servers will connect to the slave database and the application will resume operation


Business Continuity Plan
Since all layers of the application – i.e. web server, application server, and database – are mirrored in two data centers that are physically located in two different cities, FieldEZ is capable of resuming business activities even if there is a calamity in one location


Scalability
FieldEZ is designed to support high concurrent usage at every layer. The web server and application server clusters offer enough nodes to ensure that millions of transactions are supported without any performance degradation. In case you need to meet additional transaction requirements, you can add more nodes to the cluster using the Amazon cloud service.


Heterogeneous Back-End Integration
FieldEZ allows seamless and customized back-end integration of legacy applications or front-end additions with multiple applications and data within the enterprise, including SAP, QuickBooks, Salesforce CRM and Sage50


Security
FieldEZ offers stringent data security using 256-bit SSL encryption that provides end-to-end protection for message privacy, integrity, and security:

• No clear text password is stored or logged into the application
• All data transports over SSL; only SSL port of web servers open to internet
• Strict authentication checks for access to the application
• Strict authorization checks on both client and server to avoid data sharing
• Only SSH connections to servers (based on public/private keys)

FieldEZ Version 4.7.3 Released

We are excited to announce couple of feature enhancements to the FieldEZ Application:

  1. SLA Management Module (new)
  2. Call Create / Edit Page (revamped)
  3. Timesheets Tab (revamped)
  4. Call Details Tab (the new page is now default)

1. SLA Management Module (BETA)           

TO ACCESS THE NEW SLA MANAGEMENT PAGE:

Click on settings icons on the top right corner of the header, and select the Advanced Settings tab. Under the advanced settings page, click on the ‘Manage SLA’ link to access the new SLA Management (BETA) module.

Access SLA management page

The SLA Management module helps organization set and configure Service Level Agreement (SLA) notification alerts for a wide variety of actions, including:

  • Assigned User not responded to a new ticket after a predefined SLA time
  • Assigned User not reached a particular stage of the process (say, reached site) within a predefined SLA time
  • Assigned User not able to close a ticket within a predefine SLA time

In this BETA release, the admin can create new SLA for each workflow or business process defined, and set an email / notification alert. This notification can be sent any or all of the below:

  • Assigned User
  • Manager
  • Admin
  • End-Customer
  • External contact via email

Subsequent releases will also have the provision to update the end-customer via SMS (mobile text message)

1.1        SLA List Page

The image below shows the landing page when one clicks on the Manage SLA link from Advanced Settings section. The page lists the SLAs configured, with options to copy (duplicate), edit and delete the SLA.

SLA List page

Create New SLA

Click on the ‘Add SLA’ button on the top left corner. You will be prompted with a screen as shown below:

Create New SLA

SLA Label: Give a name to the SLA you are creating

Select Workflow: The SLA can be created for a specific workflow

Create Time / Assigned Time:  The SLA can be triggered based on lapsed time from either the Ticket Create Time or the Assigned End Time

Hours and Minutes:  The SLA will trigger once the time duration specified in these fields have lapsed beyond the Create time / Assigned time

Status:  This a status checker field. If the specified status is not reached at the time the SLA is triggered, only then will it trigger the alert

Alert action: This box will list the notification templates, and can be configured by going to the Notification page.

If there are no notification templates predefined, you can create:

Settings icon –> Advanced Settings –> Manage Notifications –> Create Notifications –> Create New Notification

Create New SLA -1

Note: Please select the action type as alert in the drop-down list

2.          Create / Edit Call

The Create and Edit Call pages have been revamped with a more intuitive and up-to-date UI format. All the existing functions are retained and no new features additions have been added at present.

Edit Call

3.          Timesheet

The new timesheet tab provides a high-level view of the users’ attendance across various time periods, with ability to drill-down to specific user level information.

Timesheet

The initial screen shows the clock-in (punch-in) status of the user – green shows clocked in and clocked out, yellow shows either one of clock-in or clock-out, while red shows the users who have neither clocked-in nor clocked-out.

On click of the individual colour cells, one can get an idea of the route and distance covered by the particular user as viewed on the map.

4.          Call Details Page

The new Call Details page released as per the previous release (4.7.2) has now been made the default page. To understand more details about the Call Details page and its function, please refer to the previous release notes (4.7.2) – Click here.

FieldEZ Version 4.7.2 Released


We are thrilled to bring you two important feature additions to the FieldEZ Mobile Application:

  1. Call Details Page (revamped)
  2. Map-based Scheduler (new)


1. New Call Details Page (BETA)  


TO ACCESS THE NEW CALL DETAILS PAGE:

Go to the existing call details page (from the call list page).  A link will be available at the top of the call details page – on click it will take you to the new Call Details (BETA) page.


The Call Details (named as Visit Details / Ticket Details / Job Details, etc. based on the account configuration) is now available in an easy-to-read and intuitive layout with sections highlighting the status of the job, among other details.

Call Details

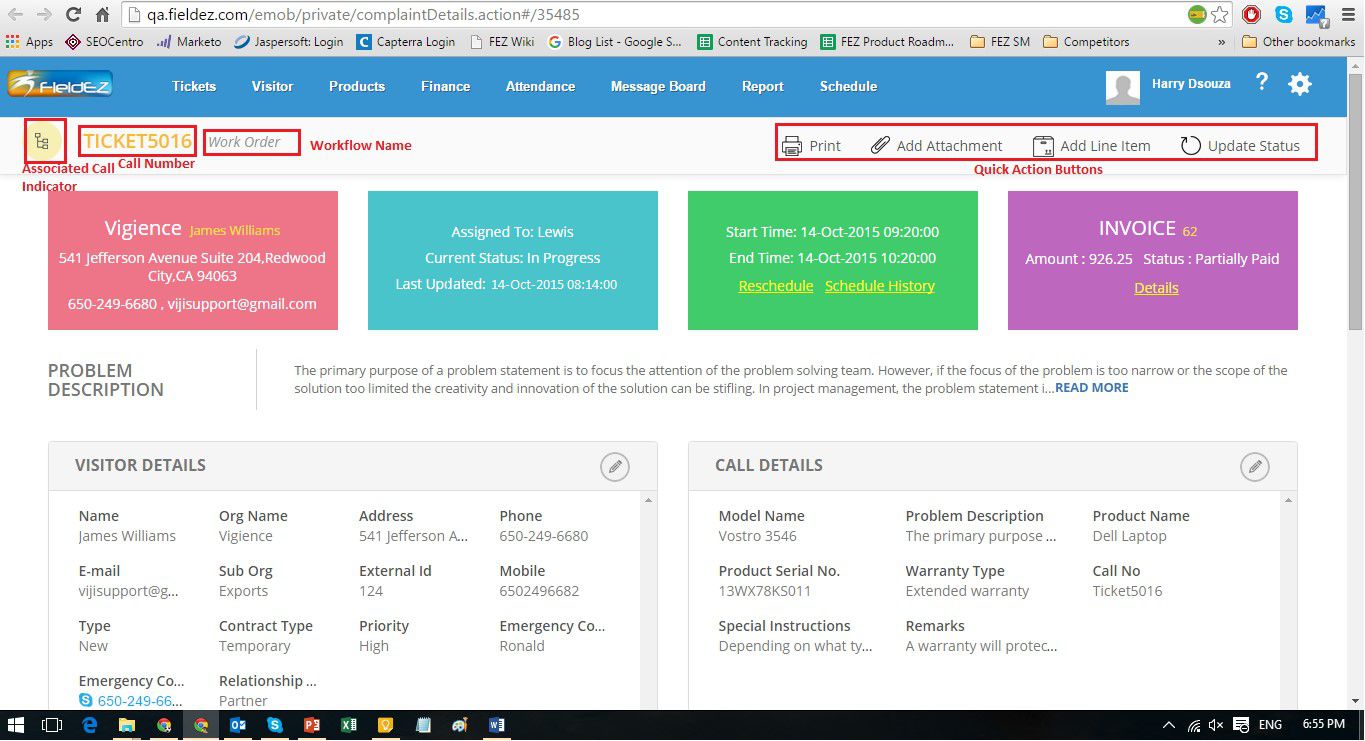
1.1        Call Summary Section

Call Summary

The top section of the Call Details page provides a summary of the Call / Ticket. These are depicted as four boxes:

  • Red Box : Customer Details (Company Name, Customer Name, Address, Contact No.)
  • Blue Box : Assignment Details (Assigned To, Current Status, Last Update Time)
  • Green Box : Schedule Details (Start and End Time, Schedule History, Option to Reschedule)
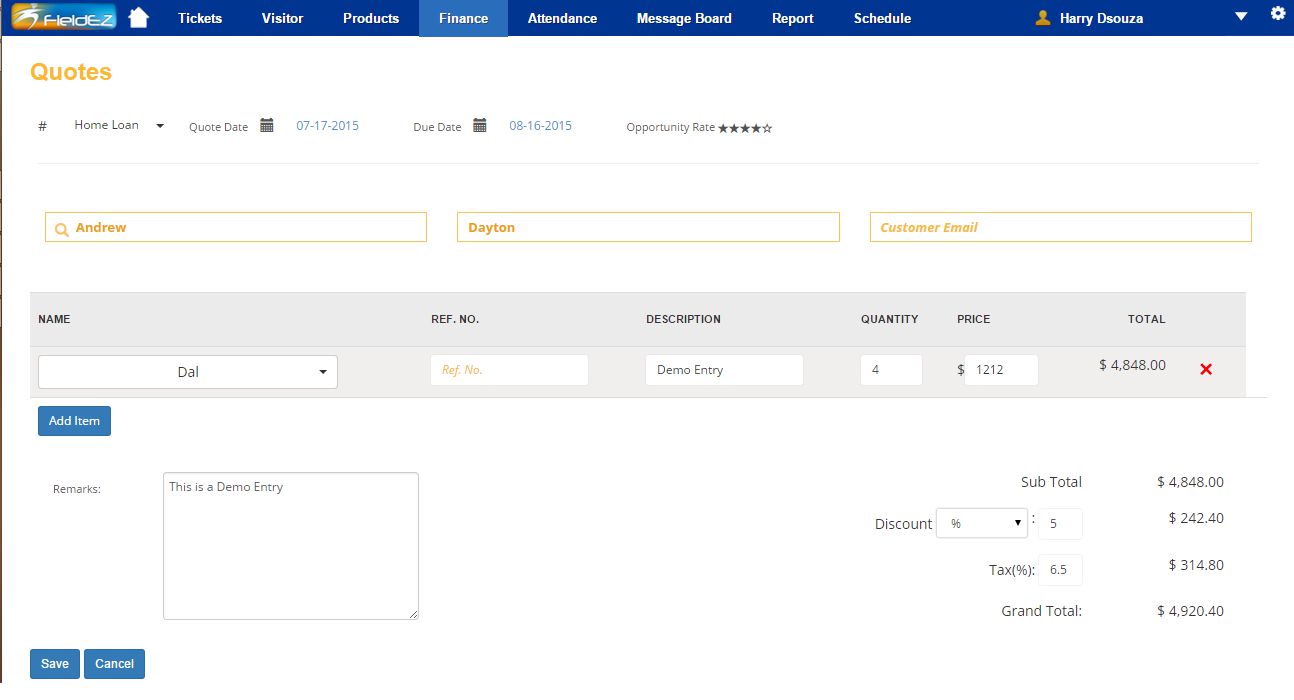
  • Purple Box : Invoice / Quote Details (Invoice / Quote Number, Amount and Status) *

* Quotes / Invoice will be shown only if the information is updated for the particular call. Also note that only the latest quote / invoice will be shown.

Below the box, you will see the Problem Description section, elaborating the call.

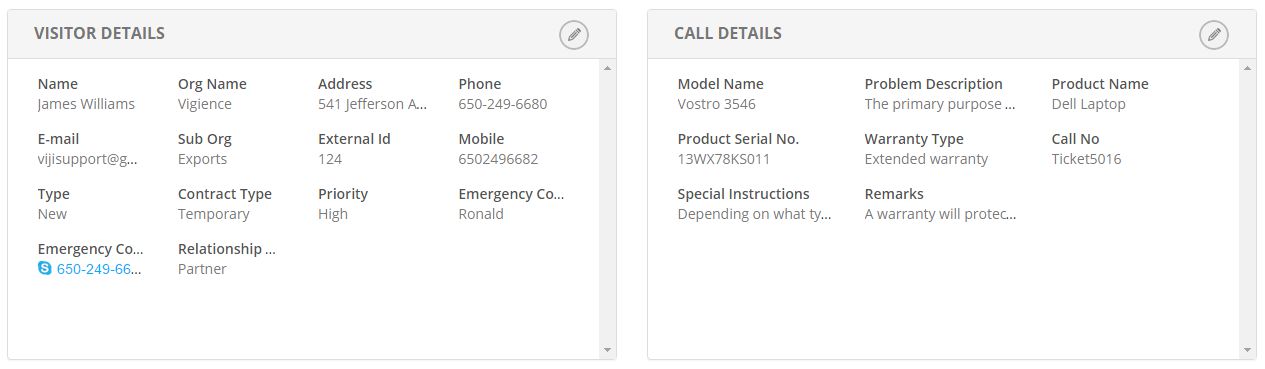
1.2        Customer and Call Level Information

The two boxes below the Problem Description lists the complete customer and call level details. One can click on the Edit icon to edit the respective details.

Customer and Call Level Information

1.3        Status Update

The Status Update section has an intuitive horizontal time-chart that lists each of the steps along with all status-level fields. Users can navigate between the steps by clicking on round button.  Use the left and right grey arrows at the corners to scroll across the timeline.

Status Update

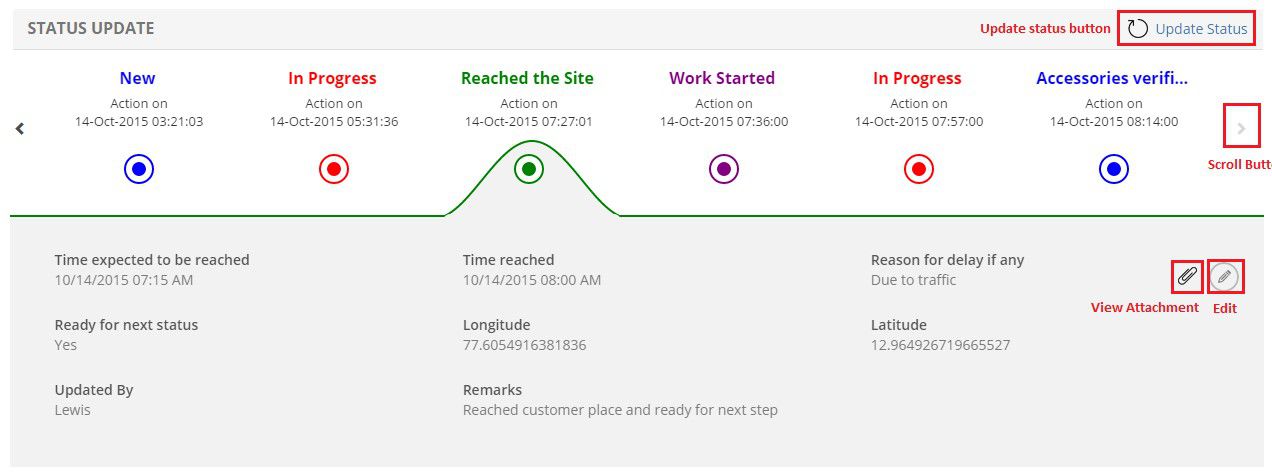
There are two buttons in the Status Update section:

  1. Click on the Update Status button to update from the current status.
  2. Click on the Attachment icon within the status level field section (if available, on the right corner), to go to view the attachments.
  3. Click on the Edit icon within the status level field section to edit the fields for the particular status.


1.4        Associated Calls

The Associated Calls section will show all child calls / tickets linked to the current Call. The user can view details of the child call by clicking the respective call box.
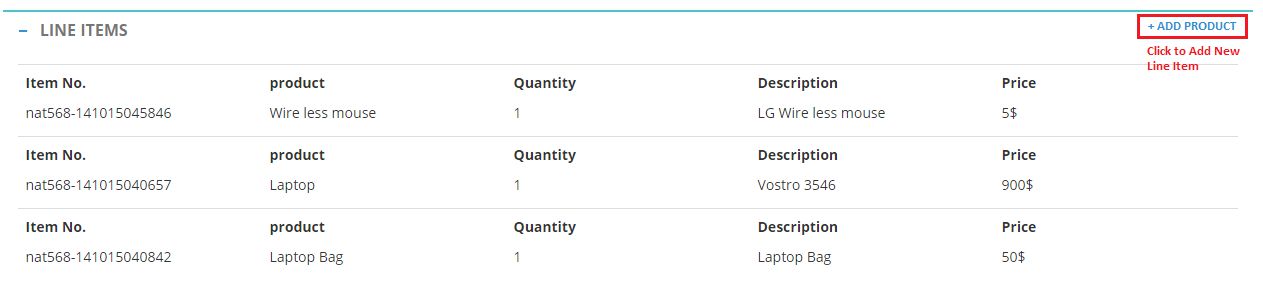
Associated Calls


1.5        Line Items

The line item section lists all parts or products associated with the call, along with related attributes and fields

Line Items

1.6        Attachment

All Call-level as well as Status-level attachments can be viewed in this section. If available, a thumbnail preview of the file will also be shown.

Attachment


2. Map-Based Scheduler (BETA)


TO ACCESS THE NEW MAP SCHEDULER:

Click on the Schedule Tab on the top header bar, and select the DAY MAP VIEW – Beta option.

You can also access the Map Scheduler directly from the existing Day scheduler using the toggle button.


The map scheduler provides users the ability to view, schedule and assign calls / jobs using a powerful yet easy-to-use map GUI.


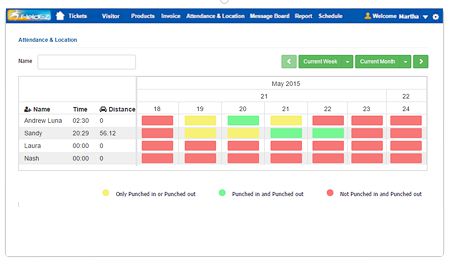
2.1        View the users on the maps

The initial view of the map will show the users’ location based on the last known location (captured from the mobile).

View Users on the map

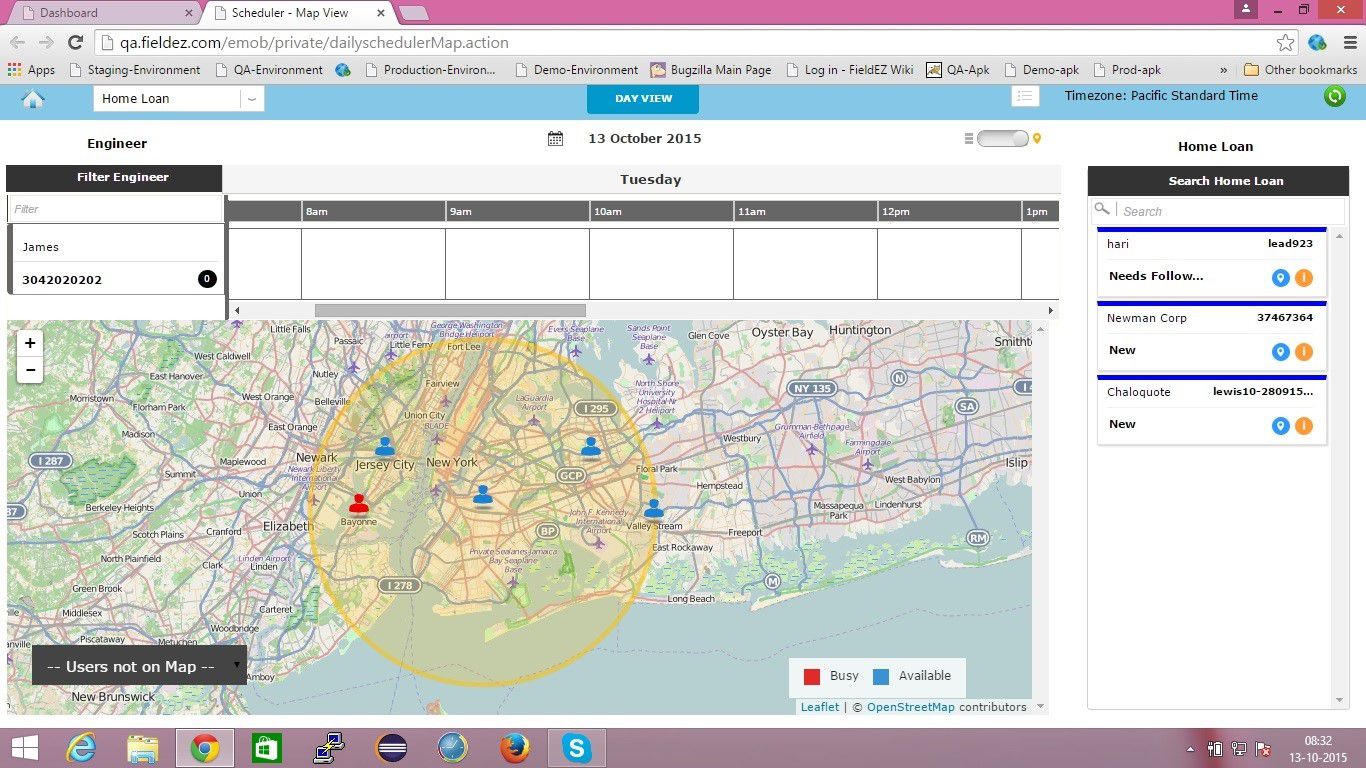
Please note that there might be circumstances where the user’s location is not available (say, the person is offline, or the location has not been captured from the mobile). This list of users is available in the bottom right corner of the screen.

The icon color of the user shows whether the person is currently busy on a call (red icon) or free (blue icon).

A yellow translucent circle floats over the map and centres to the user / job that is currently selected. This is set at a default of 20km (12mi), but can be configured. Please get in touch with FieldEZ support to customize the distance.

The other sections are similar to that of the existing daily scheduler, with the list of unscheduled ticket on the right side vertical column, a reduced version of the user’s status (just above the map – only the selected user’s schedule will be visible), and options like toggle between the map and daily scheduler in the header section.

2.2        How to schedule using the map scheduler

a) Select and view the unassigned ticket details:

Schedule using map view

The right hand side lists the unassigned tickets / jobs, for the particular work location and workflow. There are two button available against each ticket: the ‘i’ icon provide the advanced call details while the ‘map pointer’ icon shows the ticket on the map.


b) Click the ticket to view on the map:

As in the case of the existing daily scheduler, one can click on the unassigned tickets on the right hand side to view the advanced details of the ticket / job. On click, the map centres to the ticket location and highlights the nearby users.

Schedule using map view -1


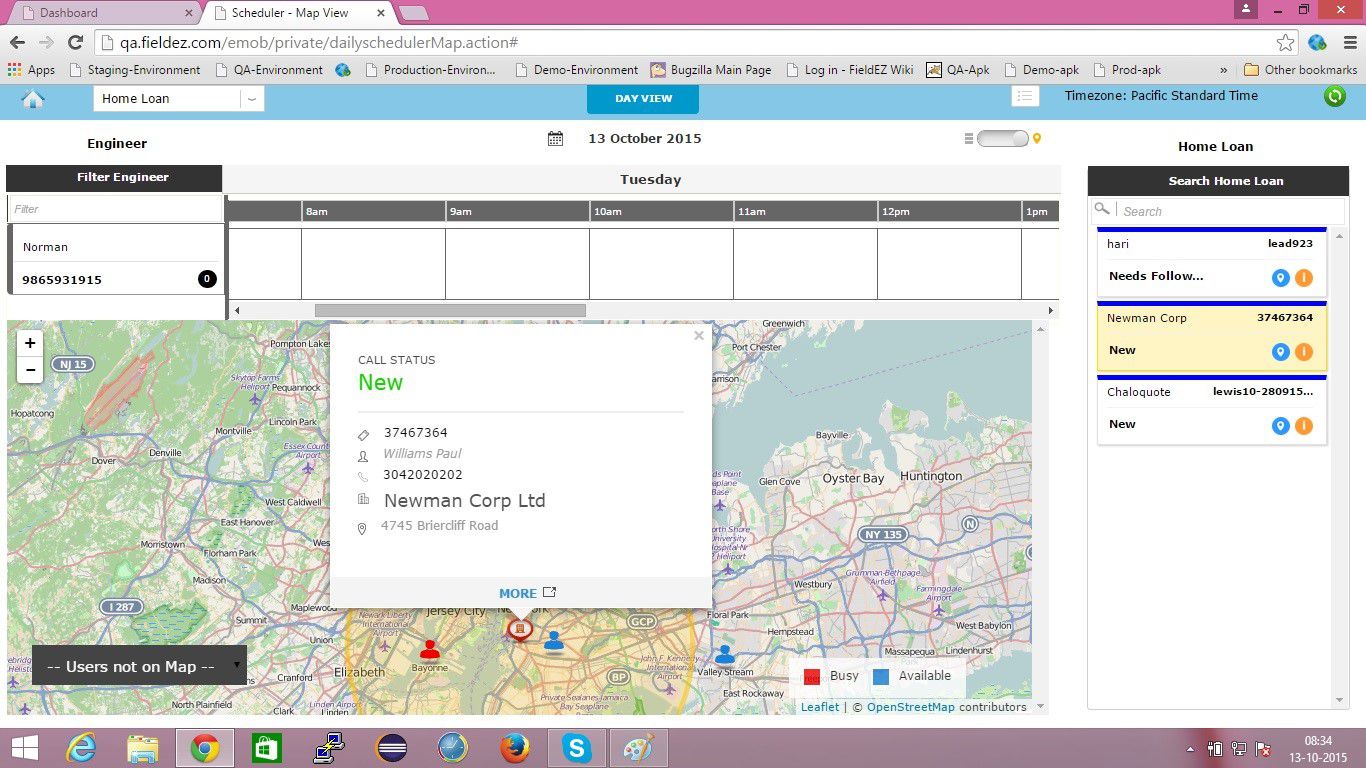
c) View details of the users around the ticket

Schedule using map view -2

By clicking on the users, the dispatch manager can view the basic details of the employee including name and contact number. The selected field user’s schedule for the day is also shown just above the map.

Note: If you would like to view and assign and ticket to a field user who is not shown on the map, simple click on the “User not on Map” drop-list (bottom-right corner) and select the field user.


d) Drag and drop the ticket to be assigned to the respective selected user:

Simple drag and drop the ticket from right section into the selected field user’ schedule – dropping it at the time when you want to schedule. You will prompted to enter the exact start and end time; once this is saved the ticket has been assigned, and will disappear from the right box (unassigned ticket list)

FieldEZ Version 4.7.1 Released

1. New Finance Module


The brand new finance module incorporates the recently launched Invoice features along with two new sections:

  • Quotes (Estimates)
  • Finance Dashboard

1.1        Quotes

The new Quotes section helps users raise an estimate or quote without the need to create a Job or a Call. Jobs get automatically created as and when the quotes get converted to a ‘win’ stage. All information captured in the quote including the customer contact information and line items are automatically copied to the respective ticket during conversion – avoiding the need to re-enter the data to the call.

Quote Listing Page

The quote listing page is similar to the invoice listing section with ability to search across customer, ticket number, quote number or status. One-touch action buttons are available directly from the Quote List page including change of status, conversion to pdf, and email to customer.

Quote Listing Page Upload Customers

Adding a New Quote

To add a new quote just click on the Add Quote button in the Quote Listing page. The new Quote creation page is similar to the Add Invoice page. Users would need to initially select the workflow, as well as select the customers from the search bar to save the quote.

Users can also rate the quotes with help of a 5-star rating option available next to the Due Date field.

Add a new quote


1.2        Finance Dashboard

The Finance Dashboard provides a bird’s eye view of the organization’s financial status. With graphical and historical analysis of quotes, invoices and payments, users can quickly check up on the financial health of the operations. The Invoice and Quote Lists provides one-touch access to all open invoices / quotes directly from the Dashboard page.

Finance Dashboard

2. Import Customers to FieldEZ


Users can now bulk upload customers to FieldEZ directly from the Customer Listing page of the web application. Simply click on the Upload Customers button (bottom left corner of the page):

Import Customers to FieldEZ

Next, download the template file by clicking on the respective button.


Upload Customers

Now update this template document (save in the .csv format) and upload back in the same page to complete the upload process.

FieldEZ Version 4.7.0 Released

1. Crew Scheduling

This new feature allows dispatchers and users to divide a single ticket / job into multiple smaller tickets or sub-tickets. These sub-tickets can be assigned and scheduled to individual field users, thus making it possible to create and track a single ticket assigned to a crew or team.

By creating a master ticket and linking sub-tickets, users can view, modify and assign specific jobs of a single project to different people in the team. This makes crew and project management simpler and more efficient.


IMPORTANT:  To enable crew scheduling, please contact support at +91-80-4536-7777  (India)/ +1 844-343-FIELDEZ (US/ rest of the world) or support@fieldez.com


How to create a Master ticket?

Create the ticket as you would normally do so from the main Ticket / Call tab.

How to create associated tickets or sub-tickets?

Click on the parent ticket to view the details. Under the details page, select the ‘Actions; Menu (right-hand side) and click on ‘Crew Scheduling’

Create associate tickets


Create associate tickets -2

Where can I see the sub-tasks?

The sub-tasks can be viewed in the ‘Associated Tickets’ tab of the master ticket detail page.

To view on the scheduler, click on the Actions menu (right-hand side) in the ticket details page and select ‘Crew Scheduling’. The scheduler can be viewed in Day, Week or Month format. The scheduler also color-codes the tickets as per the current status of each job.

To check more details of sub-tasks in the scheduler, double-click on the job in the chart. A pop-up screen will show the basic details of the job, while the advanced details can be viewed by selecting the job code number (top left corner of the pop-up screen).

sub-tasks

The sub-tasks are also shown in the weekly and daily scheduler along with the color.


How do I add crew members and modify the scheduled jobs?

The crew scheduling chart can be used to modify the date / time of the scheduled jobs. Click on the add crew scheduling button on the top right corner to add a new crew member to the job. Please note that the job is automatically created during the addition of the crew member itself. The jobs can also be re-assigned directly from this chart by a simple drag-and-drop.

add crew members

2.     Actions Menu

A menu option called ‘Actions’ is provided in the right hand side of the ticket details page. This Menu is a quick and easily accessible list of major action steps for a ticket. These include:

  • Update the Ticket or Job
  • Add Line Item for the Job
  • Add Crew Members, Create and Schedule Sub-tickets
  • Create Invoice for the Job
  • Print Job Details

Create associate tickets


Other Updates and Feature Additions

3. Start Date, End Date in Create Call

Previously, users were asked to provide the Start Date and the Duration of the call. This made it difficult to provide an exact end date and time for a particular job.

With the new release, we have made the option to provide start date and end date instead of duration. As default the end date-time will be one hour ahead of the start time.

4. Multi day schedule

Users can now schedule tickets that run for multiple days. The date-time fields are enhanced to make it easy to schedule and track.

5. Attendance Overview

A new graphical attendance chart is available under the ‘Attendance’ menu. This provides a simple view of the total time clocked-in by the field users, as well as the distance travelled. This can filtered for current week or current month for easy view.

Colors are used to depict the status of each user’s clock-in / clock-out details:

  • Yellow : Only Clocked-in or Clocked-out (forgot to clock attendance once in a day)
  • Green : Clocked-in and Clocked-out (correctly clocked the attendance)
  • Red : Not Clocked-in and Clocked-out (absent / forgot to clock)

attendance overvie