Archive for month: April, 2016
FieldEZ Version 4.7.4 Released
We have launched brand new features in the FieldEZ application in this latest release:
- Alerts & Notification in header
- Assets Module
- Recurring Schedule (new interface)
- Beat Plan / Route planning for multiple jobs
1. Alerts & Notifications in the main header
| TO ENABLE THIS FEATURE:
The Alerts tab visibility is enabled through the Roles defined for the organization. To enable, login as Admin and click on the settings icon
TO ACCESS THE ALERTS & NOTIFICATIONS: The alerts & notification tab can be enabled based on the role defined in your organization. As default, this tab is switched off in existing organizations. To enable, click on the settings button, and select Manage Roles. Click on the particular role name and tick the Show Alert option. We have added a new ‘bell’ icon
|
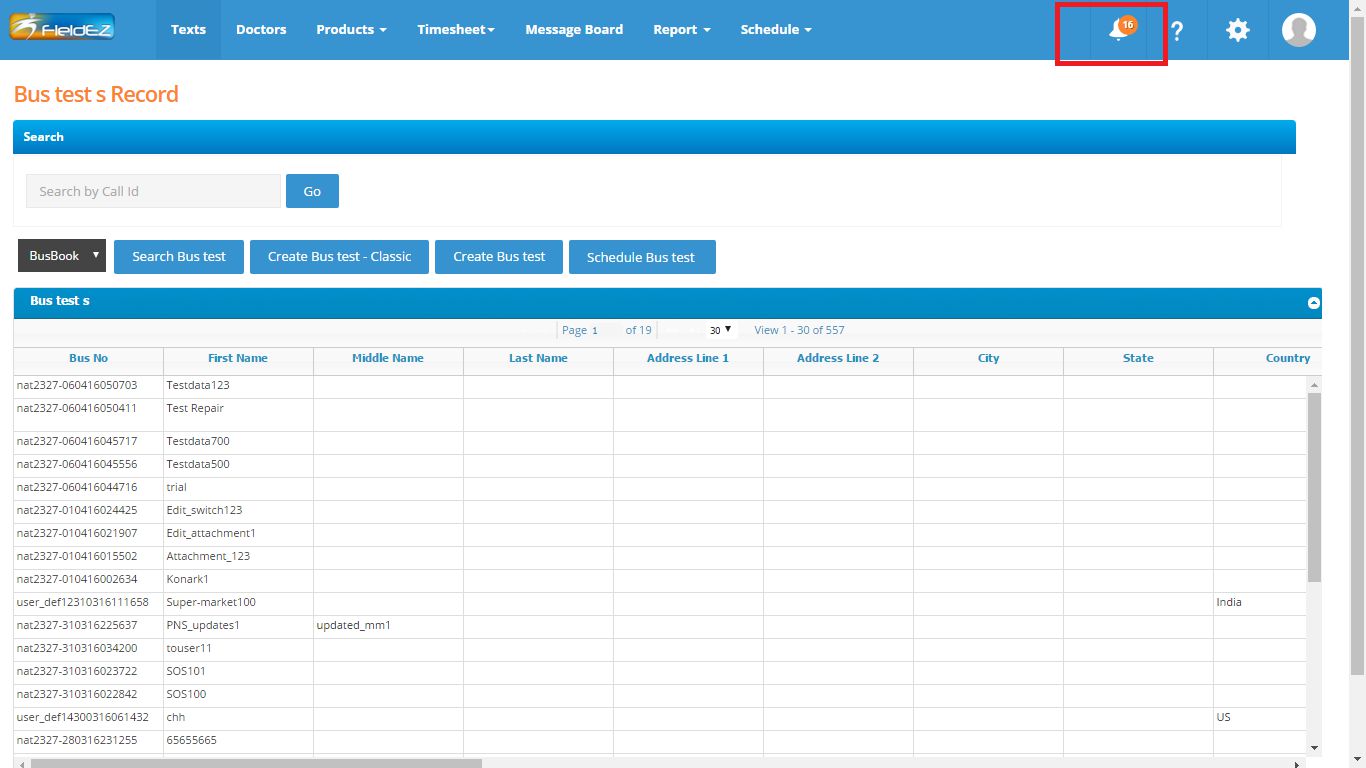
The Alerts & Notifications tab sits on the main header and hence, is visible from any page in the application. As the name suggests, any pre-configured alert as well as major ticket milestones will be highlighted in the alerts tab.
On click of the icon, the alert list will be shown as a drop-down on the page. This list is split into three types:
- New Tickets created
- These alerts are automatically generated on create of a new ticket
- Status update alerts
- These can be enabled from the Process Library page from the Advanced Settings tab in the Settings section. Please check with our support team for any help in configuring this feature.
- Custom alerts defined through the SLA page
- The alerts are generated as per the SLAs defined using the SLA module. This can be accessed form the advanced settings page under ‘Manage SLA’. Please refer to the 4.7.3 release note for more information on how to use the SLA feature.
One can click on the alert to view the details of the particular ticket / job.
Click on close to pull up the alert window.
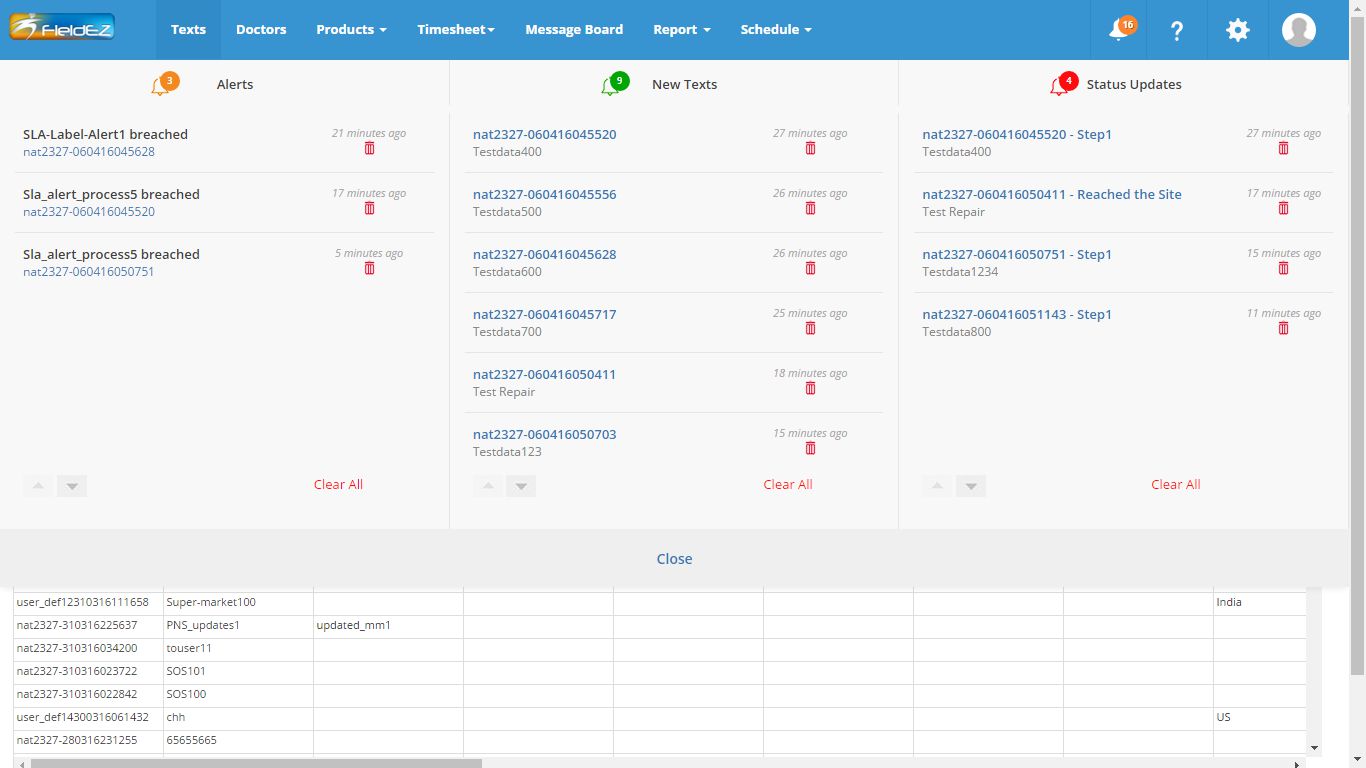
Note: The alert will remain in the respective list until it is manually deleted using the delete icon. The delete icon, hence works similar to a read acknowledgement function. One can clear all new alerts using the ‘Clear All’ link found at the bottom of each alert list.
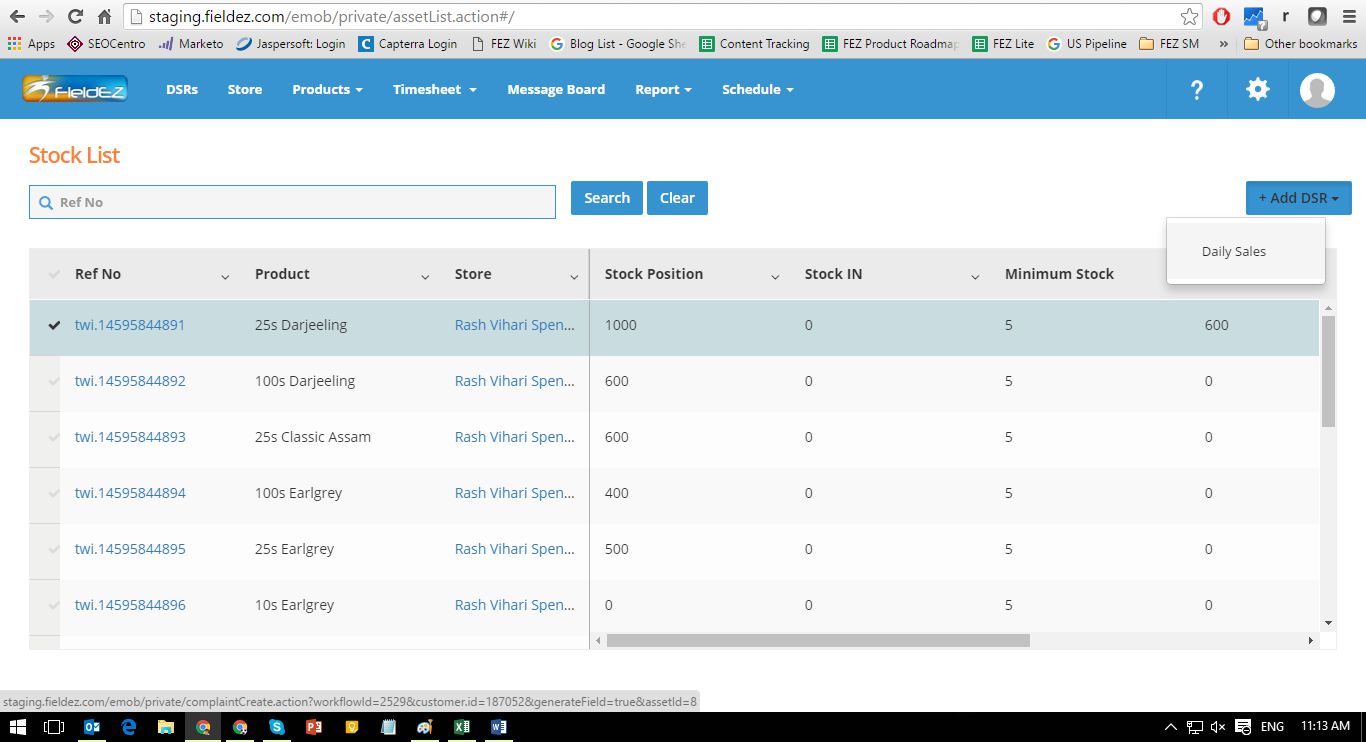
2. Assets Module
| TO ENABLE THIS FEATURE:
Go to Settings and select Advanced Settings. Next Click on Manage Preference, and change Asset field to ‘Yes’
TO ACCESS THE ASSETS MODULE: The Assets page is available under the Products tab in the main header
|
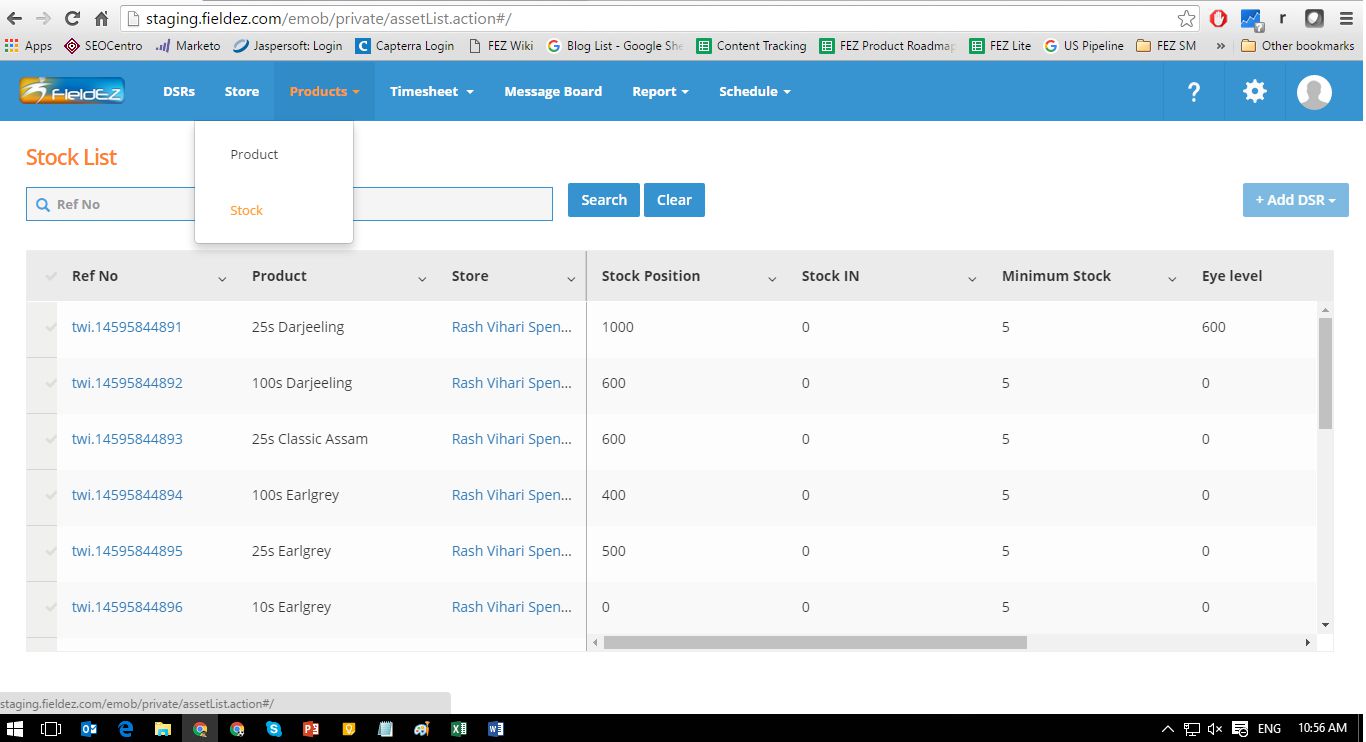
The Assets tab is a brand new addition to the FieldEZ products section. An asset is basically an instance of a product. In other words, an asset is unique (say with the unique Product id / SKU No., etc.) but can have fields and attributes similar to other assets belonging to the same product or product category.
Eg: In FieldEZ, a product category may be Mobiles, while a product in this case can be Apple iPhone 6s. An asset would be Apple iPhone 6s with IMEI 1234567890.
Hence, multiple assets can be created for a particular Product, and can be linked to a customer. Also, tickets and jobs can be created for the asset (Eg: A ticket raised for repair of a particular machinery (asset)).
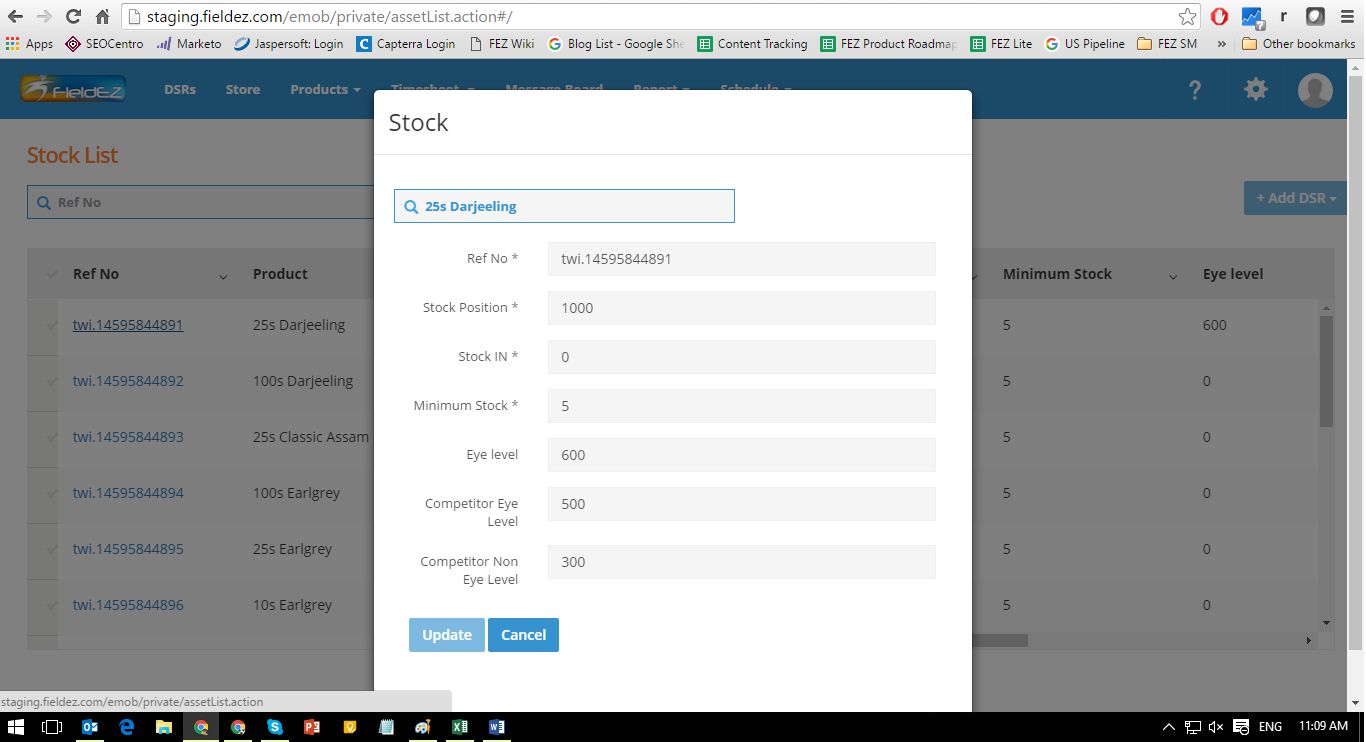
Click on the Ref. No. link to update the attributes of a particular asset. Note that the attributes are configurable from the advanced settings page. One can also directly access the customer section by clicking on the respective link for the asset.
To create a ticket from the asset page, select the ‘tick’ icon for the particular asset and then click on the “Add” blue button on the top right corner. On click, the user will be prompted to select the workflow as well for the new ticket.
Note: One can disable a call / ticket creation from an asset, for a particular workflow. To enable this particular feature, please contact FieldEZ support.
3. Recurring Schedule (new interface)
| TO ENABLE THIS FEATURE: Please contact FieldEZ Support ( +1-844-343-5339 (+1-844-FIELDEZ) or support@fieldez.com ) to help you with this function |
The Recurring schedule interface has been streamlined to make it easy to create recurring tickets and calls.
During the call creation process, you will notice two options: One-time and Recurring Jobs. On select of Recurring Jobs, it opens a pop-up to mention more details of the Recurring schedule including Start Date, End Date and repetition frequency of the job.

The recurring job feature will create new and duplicate tickets as per the frequency as well as the end dates defined. This group of jobs can be individually edited and / or detailed.
Please note that at present, one cannot make changes for the complete ticket series. This will be implemented in the upcoming releases.
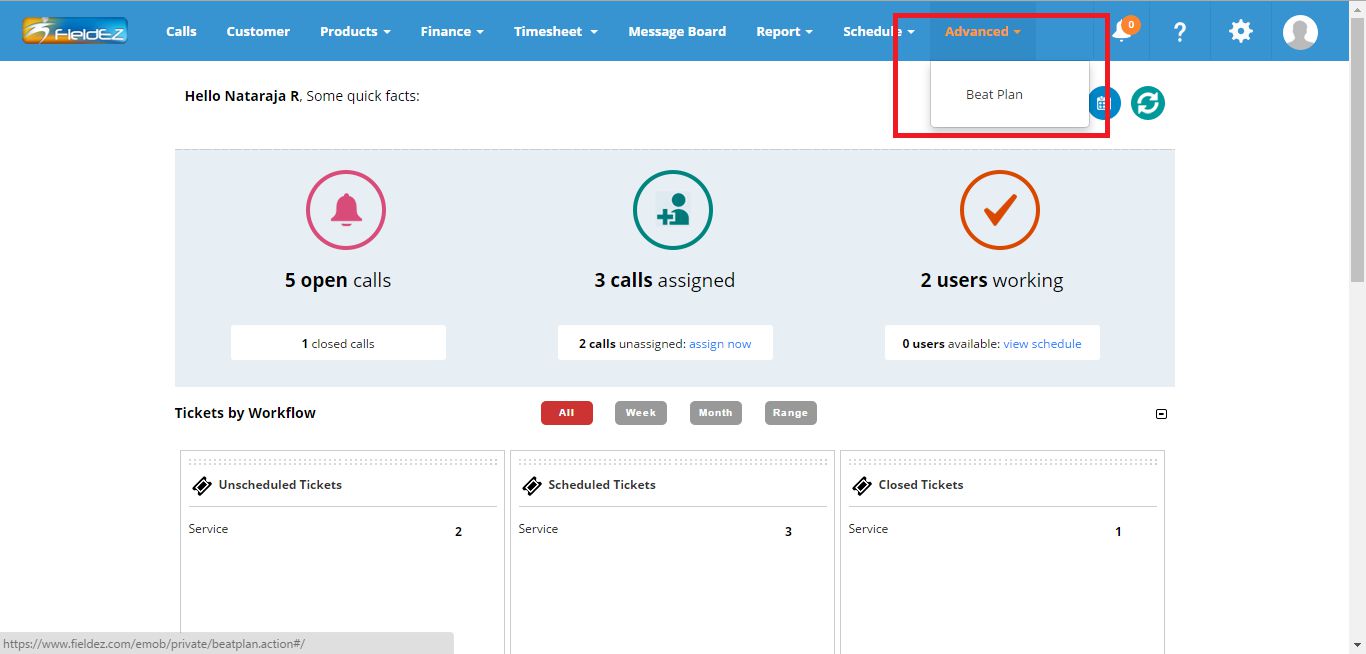
4. Beat Planning
Beat Planning is an advanced scheduling feature newly introduced in the FieldEZ application. Beat planning is essentially scheduling for a group of jobs. This is particularly helpful when there are regular or periodic visits / jobs to a pre-defined list of customer sites. Examples where this feature would be used is over periodic stocking of SKUs for FMCG and Retail organizations, Preventive maintenance checks for remote oil & gas installations, etc.
| TO ENABLE THIS FEATURE:
Click on the Settings icon
TO ACCESS THE BEAT PLAN SETTINGS: The Beat Plan page is accessible from the main header under the ‘Advanced’ tab:
|
The home page for the Beat Plan module lists the ‘beats’ created. One can create new beats using the ‘Create Beatplan’ button on the top right of the screen.
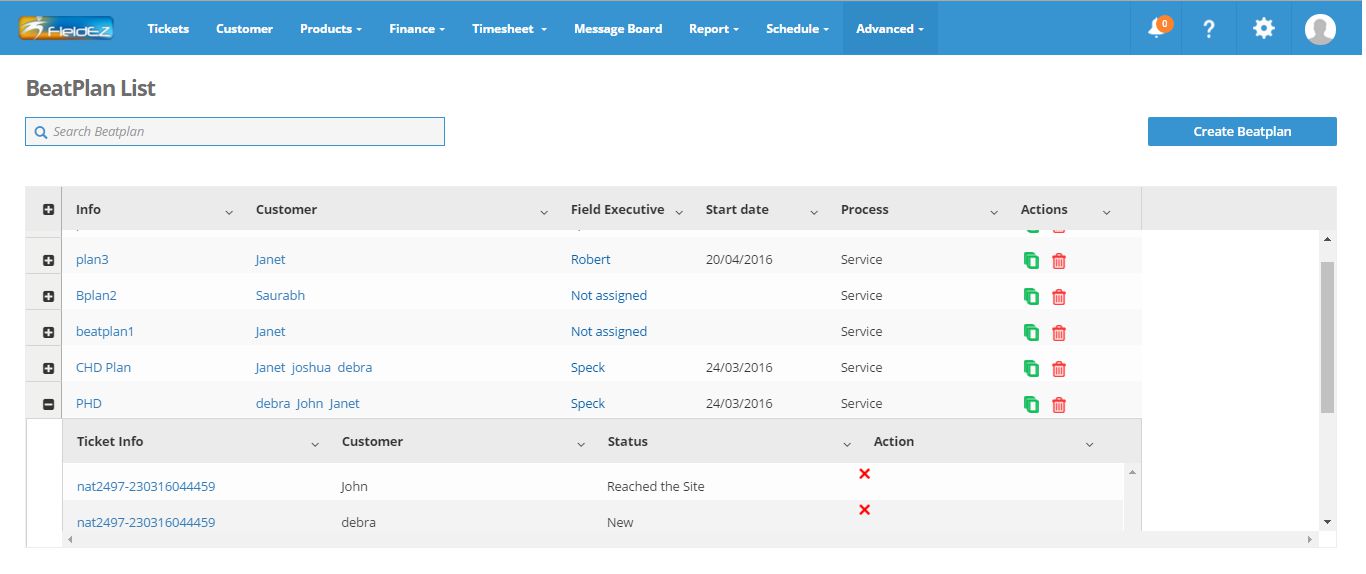
The table lists down the various beats created, as well as details on of the tickets / job created as per the beats. This can be accessed by expanding on the beat plan row details using the ‘+’ icon on the right. Individual ticket details can be further accessed by clicking on the respective ticket info link.
There are also quick action button available for each beat plan:
- The green
 icon allows one to create duplicate beats. This is particularly useful for cases where a new beat has to be planned with the same customers as created earlier for a different beat, but where the frequency / work-order, etc. is distinct.
 - The red button
 allows one to delete the complete beat plan.
Note that on delete of a beat plan, the existing jobs and tickets already created will not be deleted, but the future scheduled tickets will be deleted.
CREATE NEW BEATPLAN:
On click on the create beatplan, you will be directed to the beatplan template page.
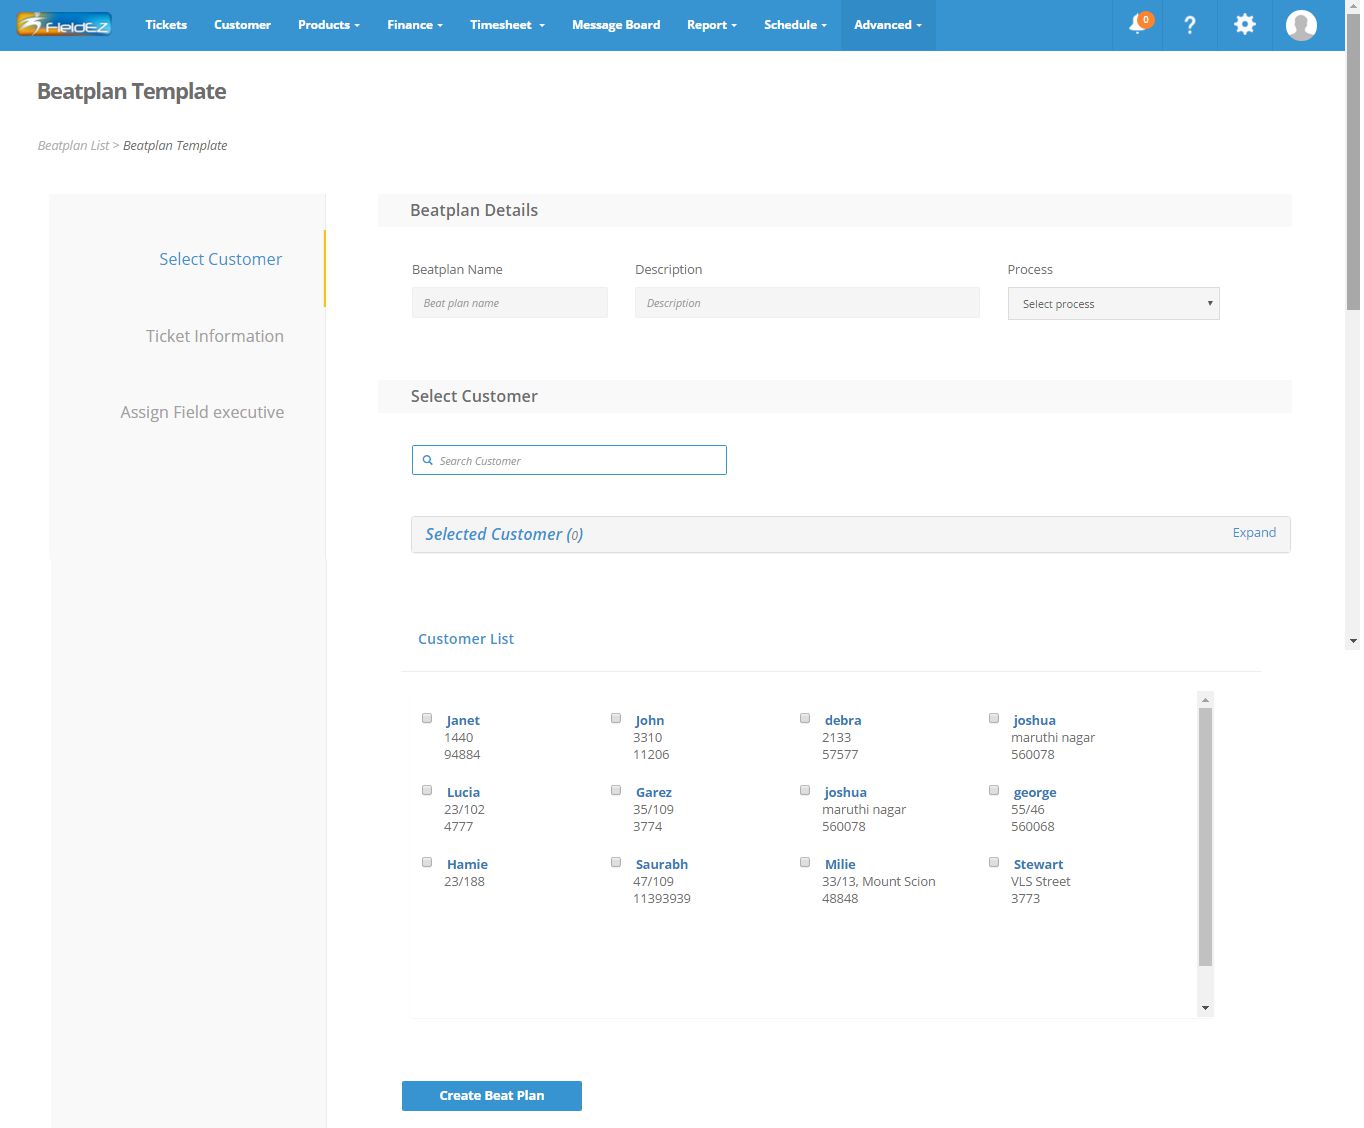
Note that the Process drop-down list (workflow list) as well as fill in the beatplan name and description for identification purposes.
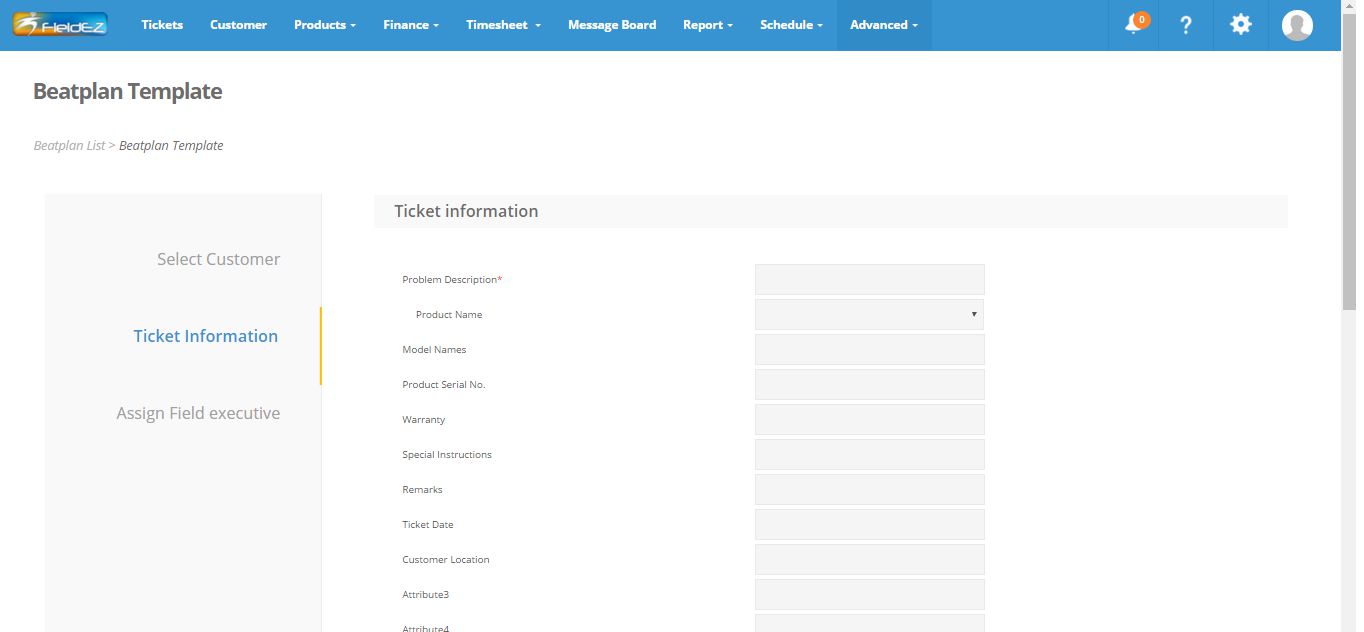
As shown in the screenshot above, the beatplan creation process is divided into three steps:
- Select Customer
- Ticket Information
- Assign field executive
To select customer, one can use the Select Customer search tab, or access it from the customer list given below.
Click on Create Beatplan button to save this customer list. The ticket information will need to be entered in the next step – these fields are the call specific information and will be copied across all the subsequent ticket / calls created as part of the beatplan.
The last step is assignment to a field resource, along with the scheduled date for the beat plan.
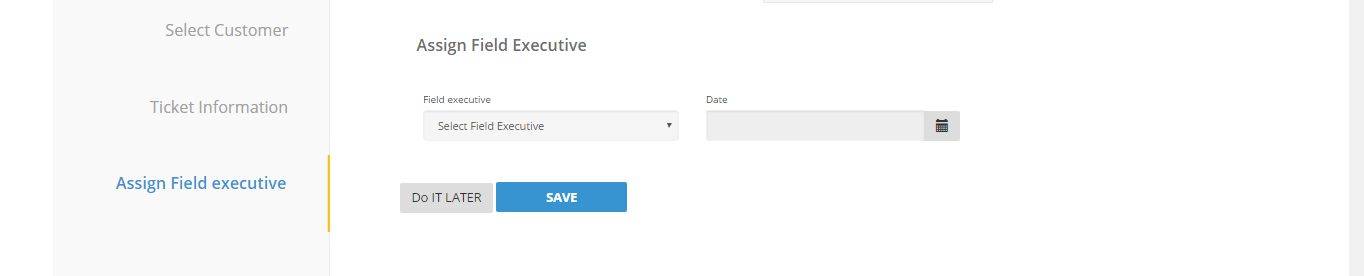
Note: At present the beat plan does not have recurring functionality, ie, the beatplan can be schedule to run once, for a particular day. The recurring feature will be done in the next product release.
EDIT EXISTING BEATPLAN:
To edit an existing Beatplan, simply click on the beatplan name. You will be able to view the beatplan details and make changes accordingly.
DELETE AND DUPLICATE BEATPLAN:
Click on the Delete icon ![]() in the Beatplan list page to delete. Please note only future scheduled calls will be deleted and any completed tickets / calls would not be deleted.
in the Beatplan list page to delete. Please note only future scheduled calls will be deleted and any completed tickets / calls would not be deleted.
Duplicate beatplan ![]() is a nifty feature where one can easily set up a new beatplan with similar characteristics (say same customer, engineer, etc.), but say with a different recurring schedule or where there is only a minor change between an existing beatplan, thus saving considerable time in creation.
is a nifty feature where one can easily set up a new beatplan with similar characteristics (say same customer, engineer, etc.), but say with a different recurring schedule or where there is only a minor change between an existing beatplan, thus saving considerable time in creation.
Field Service Management for Industrial Equipment & Manufacturing Companies
The Industrial equipment and machine manufacturing companies manufacture and service a wide variety of mission-critical, high value assets. The equipment typically worth millions of dollars is the backbone of these companies and cannot afford to have any downtime. If this equipment breaks down or malfunctions, productivity drops, costs rise, and reputations suffer; with the potential of significant revenue loss. This makes it crucial for the Industrial equipment and machine manufacturing companies to deliver phenomenal service and ensure 100% availability of the equipment.


Please follow & like us :)
![]()

